
If you have recently installed Windows 11, you may be facing a very high CPU Usage. Sometimes, you may also see that the CPU usage has touched 100%. At that time, your PC may become completely unusable. If you are regularly experiencing high CPU usage, it is now time to take some action and fix it. In this guide, we will show you how you can fix 100% CPU usage on Windows 11 and also highlight its causes.

Why is the CPU Usage High or 100%?
CPU usage should usually be in the range of 30 to 40%. Things start going south when your CPU usage increases upwards of 80%. At this time, your CPU is not able to do other tasks efficiently, and your PC starts freezing unexpectedly. In worst cases, you might also experience random shutdowns of your PC.
How to Fix High or 100% CPU Usage?
Here we have listed 4 methods that are enough to fix your high CPU usage in Windows. We recommend that you follow the steps carefully and don’t skip any.
1. Update Your Device Drivers
The first thing you should do is go ahead and update all your device drivers. Your CPU is under 100% usage because it is trying to install new drivers and apparently unable to find the one that’s suitable.
If you can go ahead and download the drivers, it make things easier for your Windows PC to stop using CPU up to some extent. If you cannot use your PC, follow these steps on a different computer or your mobile device.
- Open your manufacturer’s website.
- Enter the serial number. If you have a PC, enter the serial number of your motherboard. If you have a laptop, enter your laptop’s serial number.
- Check the drivers from the Downloads section and download the drivers.
- When downloaded, go to the Downloads Folder on your PC and start installing them following the on-screen instructions.
Once all the drivers are updated, your CPU usage won’t be high anymore, and you will be able to use your PC comfortably.
2. Update Windows
If you have been using Windows for quite some time and you have started experiencing high CPU usage just today, it means that your OS needs to be updated. Although updates can sometimes bring problems, most of the time, updates are generally helpful. Follow these steps to update your Windows:
- Click on the Windows button and open Settings.
- Alternatively, press Windows + I if you cannot find Settings.
- From the left panel, select Windows Update.
- On the right side, beside Windows Update, click on Check for Updates.
Now Windows will start checking for updates and download them. It is up to you whether you want to install the updates right now or some other time. Since you are facing 100% CPU usage, it would be wise to install the updates right now.
3. Use the Task Manager to End CPU Consuming Programs
If your CPU usage is not decreasing even after updating Windows and device drivers, it is now time to look at the CPU-consuming application and end it. Follow these steps to end tasks using the Task Manager.
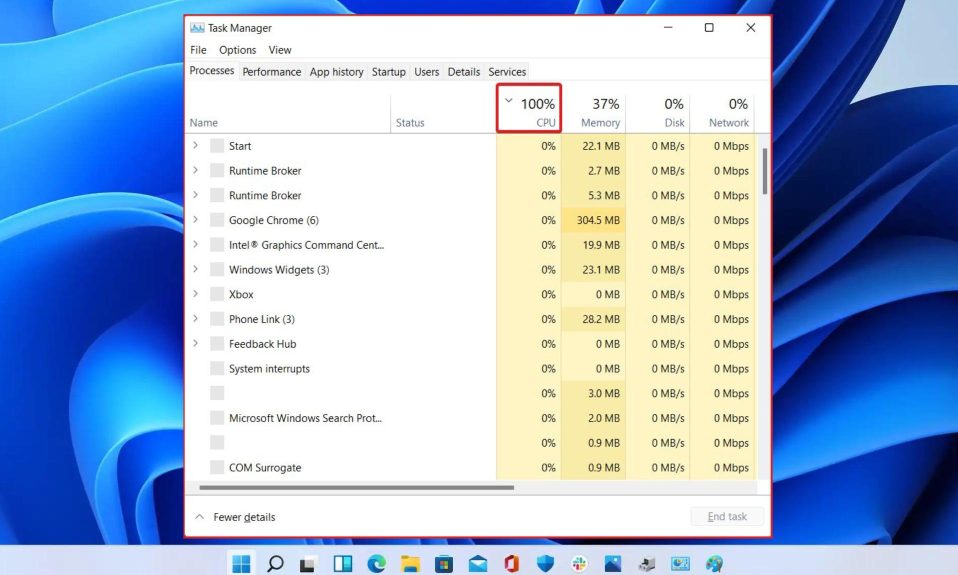
- Press Ctrl + Shift + Esc together to open the Task Manager.
- In some PCs, this shortcut may not work. You can instead press Ctrl + Alt + Del and click on Task Manager from the list of options.
- Now, stay in the Processes window, and click on the CPU tab to sort by High to Low.
- The list will now show you the resources that are using the CPU. Right-click on the program and click on End Task.
Keep doing this until you see the CPU usage is considerably less or below 40%. However, keep in mind that don’t click End Task for Windows Explorer or Antivirus Service Executable. If you end these tasks, your PC will freeze.
4. Stop Superfetch Service
Superfetch, as the name suggests, is designed to make your computer operate pretty fast. However, this service usually eats up a high chunk of CPU. Therefore, it is best that yu disable it. Follow these steps to disable the Superfetch service:
- Press Windows + R keys together to open the Run Dialog box.
- Type services.msc in the box and press Enter.
- Now keep scrolling until you find Superfetch in the list.
- Double-click on Superfetch.
- Click on the Startup Type box, and select Disable.
- Click on Apply, followed by OK.
Now you won’t face high CPU usage ever again. If you ever feel the need to enable Superfetch again in the future, you can repeat the steps above, and instead of Disabled, select Automatic in the Startup Type box.
The Bottom Line
Well, that’s all we have here about how you can fix high CPU usage in Windows 11. We hope this guide has helped you. Also, an issue similar to 100% CPU usage is the 100% Disk usage in Windows. This causes similar problems. We have covered how to fix that in our guide. If you have any questions, make sure to comment below.